INTRODUCTION
WHONET is a Windows-based database software developed for the management of microbiology laboratory data and the analysis of antimicrobial susceptibility test results. The software is available from of charge from the World Health Organization website: www.who.int/drugresistance/whonetsoftware, and is available in 16 languages.
Objectives of the software include:
- enhancing the local use of laboratory data for guiding therapy, assisting infection control, characterizing resistance epidemiology and identifying laboratory testing errors; and
- promoting collaboration in surveillance activities through the exchange of data
WHONET can be used for manual data entry, especially in laboratories without an existing computer system for microbiology data. For laboratories which do have systems for managing their data, the BacLink software is a valuable tool which facilitates the extraction and conversion of data from a number of different sources into WHONET, avoiding the need to re-enter results. BacLink can convert data from a number of common commercial database and spreadsheet softwares, commercial susceptibility test instruments, and hospital and laboratory information systems. BacLink is also available free of charge from WHO, and downloads and installs automatically along with the WHONET software.
WHONET AND CERNER
The purpose of this document is to guide users of the Cerner laboratory information system through the export of data to WHONET. These instructions should prove a valuable resource for data managers who are completely unfamiliar with the Cerner report generation and data extraction utilites and a time-saver for data administrators who are.
We anticipate that these instructions should work well with Cerner Classic versions ..... We have not yet developed guidelines for extraction of data from Cerner Millenium. For Cerner users familiar with the creation of CCL queries, feel free to edit the reports to best suit your data management needs.
The instructions are divided into four parts:
1. Downloading and installing WHONET and BacLink
2. Exporting data with Cerner: You will use the Cerner CCL query generator to create a text file with the desired microbiological information. Instructions for the export of both archived and active data are provided.
3. Converting data with BacLink: BacLink will convert the file that you created with Cerner to a WHONET file
4. Getting started with WHONET
The frequency of data conversions depends on the local data analysis needs and interests. Many laboratories find that a weekly or monthly download is adequate for their infection control and quality assurance purposes, while less frequent analysis may be adequate if the principal use of the data is in following trends in resistance and guiding treatment recommendations. Automated daily downloads of data from Cerner into WHONET is also a possibility, but is not described in this manual.
For any assistance or clarifications required, please feel free to contact:
For Cerner-related issues:
Carol Hurrie
System Analyst III
Mercy Hospital
Information Systems
3663 S Miami Avenue
Miami, Florida 33133
churrie@mercymiami.org
For BacLink and WHONET-related issues:
John Stelling
Co-Director, WHO Collaborating Centre for Surveillance of Antimicrobial Resistance
Brigham and Women’s Hospital
Microbiology Laboratory
75 Francis Street
Boston, Massachusetts 02115
jstelling@rics.bwh.harvard.edu
PART 1. DOWNLOADING AND INSTALLING WHONET AND BACLINK
The WHONET and BacLink softwares are available free-of-charge from the World Health Organization website: www.who.int/drugresistance/whonetsoftware
You will see a file called: whonet54setup.exe
Save this file onto your computer. Then double-click on the file to begin the installation process. This process will install both the WHONET and BacLink softwares, by default into the c:\whonet5 folder. When you complete the installation, you will see icons for WHONET and BacLink on your desktop. Manuals for both softwares can be found in c:\whonet5\docs.
PART 2. EXPORTING DATA WITH CERNER
The below steps described the extract of both archived data (from historic EH01 and MB01 records) and active data (PR05 and MB01 records). The steps are very similar.
1. In the folder c:\whonet5\machines, you will find a number of CCL query files. Copy the files Cerner_archived_data.ccl, Cerner_active_data.ccl, and Cerner_report.ccl into your ccl directory. If you are using the Reflections emulation software, you should use File, Transfer.
2. For archived data
Edit the file Cerner_achived_data.ccl at the indicated approximate line numbers to adapt the CCL queries for use in your laboratory, indicating the desired values which your Cerner system is using:
67: Following “MEASUREMENT = “: Indicate which procedure(s) contain the MIC Values in your system. In the example, the procedures 6200830 and 6200832 are used.
73: Following “INTERPRETATION = “: Edit the line to indicate the same procedure(s) you indicated in line 67, e.g. 6200830 and 6200832. This will exclude the MIC values from the MIC interpretation field.
95: After the text “Enter Procedure Number range for Microbiology”, enter the range of procedure numbers used for microbiology test results. In the example, this is: BETWEEN 6200000 AND 6400000
99: Optional. If needed, edit the pattern for the specific accession numbers desired. In the example: S1.ACCESSION1 IN ("*BL*","*MB*")
102: Optional. If you want a full year of data, you could edit out the line stating AND PERIOD = S1.PERIOD1. Otherwise, leave this line in.
107: Indicate the procedure number used in your Cerner which indicates a FINAL REPORT. In the example, this code is 6200885.
129: Optional: If you only wish to export certain patient types, edit this line. Options in the example include EH.PAT_TYPE IN ("L","I","F","E").
3. For active data
Edit the file Cerner_active_data.ccl at the indicated approximate line numbers to adapt the CCL queries for use in your laboratory, indicating the desired values which your Cerner system is using:
77: Following “MEASUREMENT = “: Indicate which procedure(s) contain the MIC Values in your system. In the example, the procedure 6200832 is used.
83: Following “INTERPRETATION = “: Edit the line to indicate the same procedure(s) you indicated in line 77, e.g. 6200832. This will exclude the MIC values from the MIC interpretation field.
102: After the text “Enter Procedure Number range”, enter the range of procedure numbers used for microbiology test results. In the example, this is: BETWEEN 6200000 AND 6400000
105: Optional. If needed, edit the pattern for the specific accession numbers desired. In the example: S1.ACCESSION1 IN ("*BL*","*MB*")
110, 114, and 142: Indicate the procedure number used in your Cerner which indicates a FINAL REPORT. In the example, this code is 6200885.
119: Optional: Enter any site-specific edits if you wish to exclude any specific comments, observations, etc.
129: Optional: If you only wish to export certain patient types, edit this line. Options in the example include PR.PAT_TYPE IN ("L","I","F","E").
4. Include the CCL query files in your system, for example with the following syntax:
(%I CCLPROG:CERNER_ACHIVED_DATA.CCL)
(%I CCLPROG:CERNER_ACTIVE_DATA.CCL)
(%I CCLPROG:CERNER_REPORT.CCL)
5. Go to the ccl prompt.
For archived data, type: 1WN GO
For active data, type: 1WHONET GO
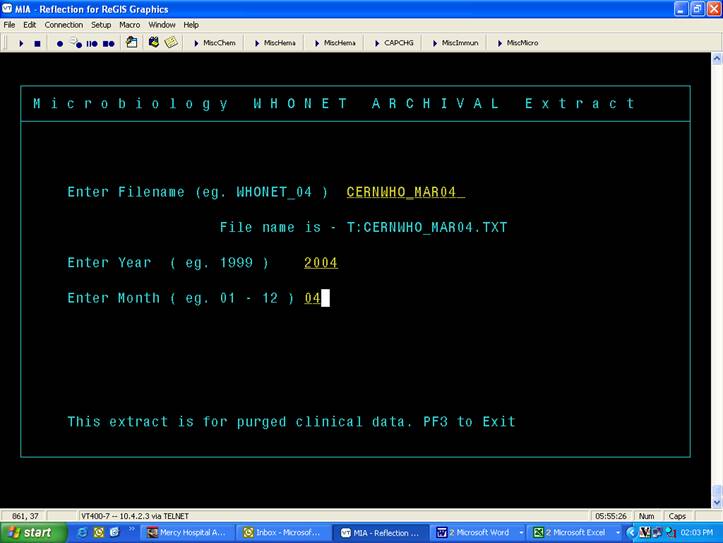
For archived data, you will see the following interface:
For active data, the following screen will appear
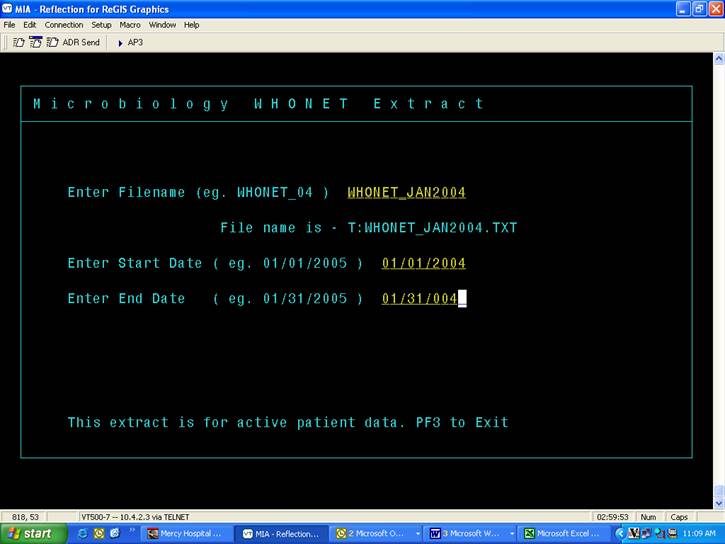
6. When you run a report, the report files will be written to the T directory.
7. Optional – Feel free to add any additional prompts to your interface, for example asking the user to indicate a specific Institution or Client for the export. You may also add the queries to CCM or create a TIM Record, and run from the Select prompt.
Note: You should NOT change the record length.
SAMPLE TIM RECORD

PART 3. CONVERTING THE FILE WITH BACLINK
Now that you have created a data file with the desired data from the Cerner system, BacLink can be used to convert this export file to the WHONET file format. The below instructions are meant as a quick guide. Detailed instructions can be found in the BacLink manual, baclink2manual.doc, by default in the folder: c:\whonet5\docs.
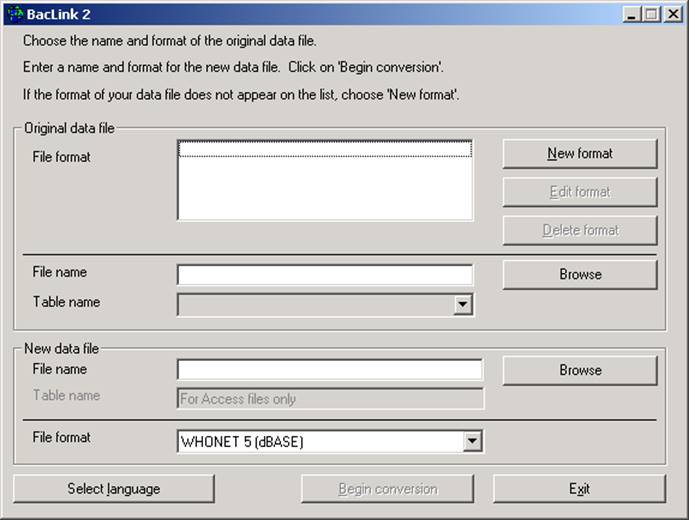
Start the BacLink program by double-clicking on the BacLink shortcut icon installed on your desktop. The BacLink program screen appears.
1. Configuring BacLink for Cerner data
The first time that you use BacLink, you will the tell the software what kind of data file you would like to import, as well as the name and a code for your laboratory.
Click on the New Format button. The File Format screen opens.
From the drop down box, select the Country: for example, United States.
Enter the Laboratory Name – the name of your laboratory, for example Boston General Hospital. If you will potentially import data from a number of different sources (Cerner, Excel, etc.), you may wish to indicate this in the laboratory name, for example Boston General Hospital (Cerner).
Enter up to three characters for the Laboratory Code, for example BGH. The laboratory code that you indicate will be used by BacLink and WHONET as the default file extension for your WHONET data files.
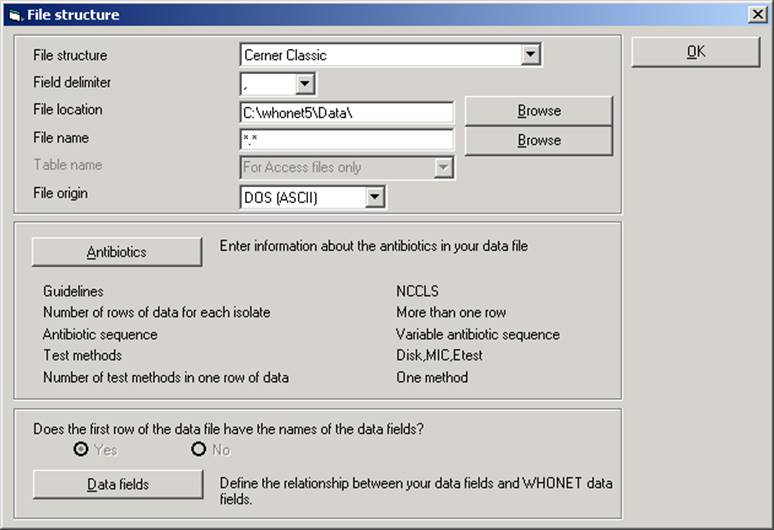
Click on the File Structure button, and the below screen will appear. Set the selections as follows:
File Structure – Cerner
File Location – Indicate the folder where you plan to save your downloaded Cerner files. c:\whonet5\data is the default location suggested by BacLink, but any convenient location can be used. In many institutions, data files are placed in a folder on a central server.
File Name – If your downloaded data files will generally end in “.txt”, then leave the default response as “*.txt”. Otherwise, indicate an appropriate filter which will facilitate finding your data files, for example: “*.*”, “*.csv”, “micro*.*”, etc. If the name of the downloaded data file will not change over time, you may indicate the fixed name, for example: “download.txt”
File Origin – DOS (ASCII)
Click on the OK button.
Though not required, you may wish to click on the New data file button. On this screen, you can indicate the default data File location for your new WHONET files. By default, BacLink will put the WHONET files in the same location as your original Cerner files. You can also indicate the name of the WHONET file that you will create, though it is generally more convenient to give a file name later, just before a file conversion, and not here on this screen. The default WHONET file name will have the three-letter laboratory code as the file extension.
Click on the OK button.
Click on Save. Give a name to the BacLink configuration file, which will save the above-indicated user selections, for example “bwh.cfg” or “cerner download.cfg”. You may give any valid Windows file name. BacLink will add “.cfg” as a file extension to indicate to BacLink that this is a configuration file.
Click on Exit. This will return you to the main BacLink screen. Your newly defined file format will appear on the list of formats available to you.
2. Converting data with BacLink
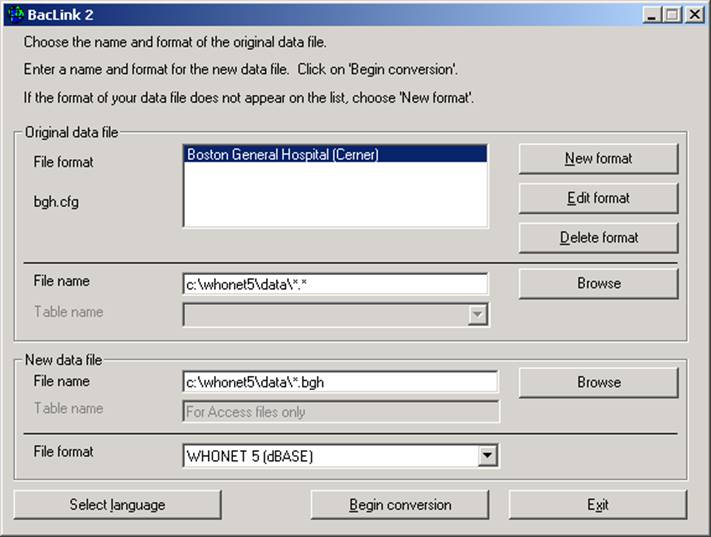
Original data file
From the main BacLink screen, click on the File Format configured in the previous step. On the BacLink 2 screen under “Original data file”, “File name”, select the download file to be converted. Example c:\whonet5\data\jan2003.txt.
New data file
Enter a name for the new WHONET data file that you wish to create with your converted data. Example: c:\whonet5\data\jan2003.xxx, where ‘xxx’ refers to your three-letter laboratory code. Your screen should then look similar to the following:
Click on Begin Conversion. BacLink begins converting the downloaded delimited file to a WHONET 5 file. BacLink will show you the first three isolates to permit a visual inspection of the accuracy of the conversion. The information from your data file, as read by BacLink, appears to the left of the screen. The information which will be saved in the WHONET file appears to the right of the screen. Where appropriate, WHONET will change your codes and formats to those used by WHONET.
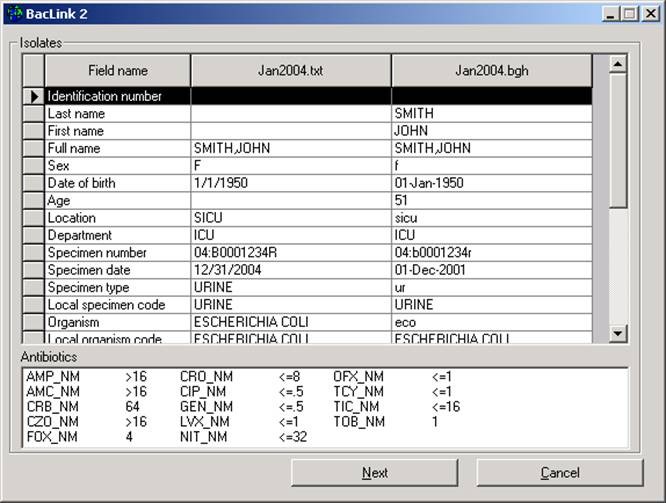
If you notice any discrepancies or errors in the field mappings, you may correct these from the main BacLink screen using “Edit format”. Click “Next” to advance through the first three isolates. BacLink will then continue until the file is completely converted.
If BacLink does not understand some of the data codes in your file, the program asks whether you would like to define the unrecognized codes. If you answer Yes, you will be shown a list of the various organism, antibiotic, specimen type, location, gender, and test result codes that could not be understand. Click on a variable of interest, such as “Organism”, and click Define codes.
You will subsequently be shown a list of each of the unrecognized code. Select a code and click Define code. For most variables (except Location), you will be asked to select the matching or closest term from a list of WHONET codes. For Location, you will have the option of defining the patient department and type (inpatient, outpatient, ICU, etc.). Continue defining codes until you have defined all, or at least the most important and frequent, data elements. When finished, click “OK”, “OK” to return to the main BacLink screen.
If you have defined some additional codes, you should then convert the same file a second time in order to include the new code matchings in the converted data file. When finished with BacLink, click Exit.
PART 4. GETTING STARTED WITH WHONET
Now that you have created a valid WHONET file using BacLink and your Cerner data, you can proceed to WHONET. For details on the use of WHONET, consult the manual WHONET 5.0 whonet5manual.doc, as well as available update pages describing the enhancements of further versions of the software.
1. Creating a laboratory configuration
To begin using WHONET, you must first create a “Laboratory configuration” with descriptive information about your laboratory -- antibiotics, breakpoints, patient locations, etc. For laboratories not using BacLink, this is typically done with a feature called New laboratory. However, for users of BacLink, there is a shortcut available called Create a laboratory from a data file.
Double-click on the WHONET icon. You will be shown a list of WHONET laboratories defined on your computer (with the default installation, you will see a single laboratory – “USA Test Hospital”). To access the aforementioned shortcut, click on Cancel. Then click File from the main WHONET menu, and then the option Create a laboratory from a data file.
You will be requested to indicate your country, laboratory name, and laboratory code. Enter the responses using the same country and laboratory code which you selected in BacLink.
You will then be requested to select a valid WHONET data file. Search and select for the file which you created above using BacLink. Then click OK. At this point, WHONET will scan the contents of this file – antibiotics, location codes, etc. – and create a valid WHONET laboratory configuration. When requested, you can click Yes if you want to review the details of the configuration. Otherwise, click No, and you can continue with Data analysis.
Note: After creating the configuration utilizing the here-described shortcut, further edits, such as any modifications to the antibiotic breakpoints, can be done with Modify laboratory.
2. Using WHONET
Once you have defined a laboratory configuration, it will appear in the list of laboratories when you enter WHONET. Click on your laboratory name. For data entry or data analysis options, click on Open laboratory. If you wish to modify the laboratory information in the configuration, click on Modify laboratory. For use of the WHONET analysis features, explore the screen display and/or consult the manual.